Setup a Linux Environment
Download Installer
Download the installer. The latest installers can be found here:
https://admin.ultrawpm.com/iapi/1.0/private/version
The Linux install scripts are small, but require a network connection to download Firefox, Chrome, Java, apt updates, etc.
The Private Agent processes run under a separate user account called "wpmuser." Supervisord is used to start the Private Agent on boot up. It controls the set of processes that are needed to run the agent. On system reboot, Supervisord runs automatically and starts the Private Agent processes. Supervisord allows you to cleanly stop and start the Private Agent.
Minimum Requirements
- 1GB RAM
- 8GB disk space
- 2GHz CPU
Recommended
- 1GB RAM per concurrent user
- 20GB disk space
- 1 CPU per concurrent user
Install
1. Grab the latest scripts
wget http://wm2-privateagent-prod.s3.amazonaws.com/assets/linux/private-agent-setup-{version}.tar.gz
2. Unpack
tar xzvf private-agent-setup-{version}.tar.gz
3. Edit config.ini and fill out the agent.id, private.key and location.
Configuration Values (agent.id, private.key & location)
1. Navigate to the Private Agent page in WPM monitoring: https://monitor.ultrawpm.com/agents/privateagent/
2. Click on the private agent you want to download the config for and then click 'Download Config':
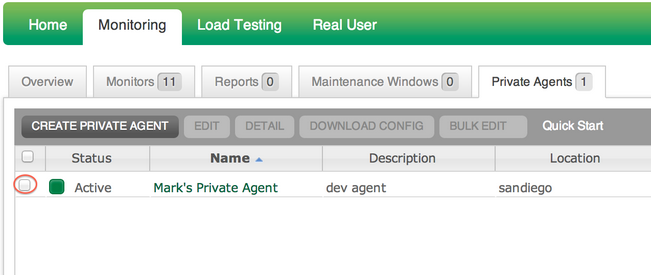

3. The following pop-up will appear:

4. Click Download to obtain the config.ini file
Start the Private Agent
The private agent is started automatically on boot up, but, if stopped (or it errors out and you fix the error), you can start it again with the following.
sudo supervisorctl start private-agent
Stop the Private Agent
If for some reason you want to stop the Private Agent (e.g. to edit the config.ini), enter the following.
sudo supervisorctl stop private-agent
View the Private Agent Logs
While running you can view the logs from the Private Agent using the following.
sudo supervisorctl tail private-agent
Also, the log file can be accessed directly under:
/home/wpmuser/privateagent.log
Capture a Screenshot of the Desktop
sudo -i -u wpmuser DISPLAY=:1 scrot
Config File
The Private Agent config is located under /home/wpmuser/config.ini
This file can be used to configure the location of the version of Firefox to use, and the locations of Chrome/Chrome Driver if installed to directories other than the default.
##############################################################################
# PRIVATE AGENT SETTINGS:
# agent.id - unique ID for agent (32 character hex string)
# private.key - account private key (32 character hex string)
# location - name of location from which this agent will monitor
# monitoring.timeout - script execution timeout (in milliseconds)
#validation.timeout - Validation execution timeout(in milliseconds)
##############################################################################
agent.id=<your agent.id>
private.key=<your private key>
location=<your location MUST match location in monitoring console>
monitoring.timeout=<timeout in milliseconds>
validation.timeout=<timeout in milliseconds>

##############################################################################
# CHROME Settings
# chrome - path to your Google Chrome executable file
# chromedriver - path to where you installed chromedriver
# For example: Linux
# chrome=/usr/bin/google-chrome
##############################################################################
chromedriver=/home/wpmuser/private-agent/chromedriver
chrome=/usr/local/bin/google-chrome

##############################################################################
# FIREFOX Settings
#
# For example: Linux
# ff=/usr/local/bin/firefox
##############################################################################
ff=/usr/local/bin/firefox

===================
Connection Settings
===================

The Private Agent fetches monitors to run and uploads monitoring results to WPM via the following host:

Host: admin.ultrawpm.com
Port: 443 (HTTPS)

Check that you can contact the host by pointing your browser to:

https://admin.ultrawpm.com
VNC Into the Desktop
If the VM was created manually by running the "bootstrap.sh" script, port 5901 should be open ("bootstrap.sh" adds the port to iptables).
The default password is "wpm12345"
Change the VNC Password
The default password is "wpm12345." To change this, edit the "settings.sh" file from the "private-agent-setup.tar.gz" bundle before installing. After installing, this file is located under "/home/wpmuser/settings.sh." If the file is edited after the install, you will need to cycle the Private Agent.
sudo supervisorctl restart private-agent
Change the Number of Concurrent Browsers That Can Be Open
By default, this is set to "1." On Linux, there is the option to increase this number. For each browser that can be open, there is a separate XDisplay and VNC session. After the base requirements have been met, we recommend and additional 1 core and 512MB for every additional browser session that can be open.
Firewall Ports
- Java, PhantomJS, ChromeDriver and Geckodriver are allowed to create listening sockets, however only packets from the loopback address are allowed by the firewall.
- The VNC port is opened, to allow incoming VNC connections
-
On Linux: 5901-(5900+n where n is the number of users)
-
- Outbound connections to by all platforms:
-
https://admin.ultrawpm.com are needed
-
-
Outbound connections to s3.amazon.com are needed by the Linux installer